Eowyn's Travelling Coat

Making a Pattern from Simplicity 9888

Simplicity 9888 is a pattern for a juniors knit top, skirt and pants. It's also the perfect base for Eowyn's Travelling Coat. It's the same pattern I used for my Shieldmaiden vest.

Here's how I made the pattern for my coat. To do this you'll need a lot of muslin (I think I used about 8 or 9 yards. I ended up using about 7 in the final coat) and all the other usual sewing supplies.

First, fit the bodice in muslin. Cut the bodice one size larger on the side seams to allow coat to fit over clothes. Cut neckline and shoulder line to your size. Cut front on selvage edge, (not on fold as directed in the instructions). Sew side seams, center back seams and shoulder seams. Try on. Check the fit. Does it fit easily around your body? If it's tight, add more width, if it's loose, take it in a little. Does the neckline lay flat, or does it gape? If it gapes and the rest of the bodice fits, try taking it in at the shoulder line. Usually making a larger seam allowance at the neckline (angled so if the armscye fits, you don't have to change that) will fix this. Make sure that your arms feel comfortable and aren't pinched. If the armscyes are too tight, simply mark where they're tight and cut fabric away until they're comfortable. Once you're happy with everything mark the waistline. Take the muslin off, take it apart (I always find this step painful!) and make a second muslin based on this one to double check it. Just use this muslin as a pattern to cut the second one.

The Sleeves

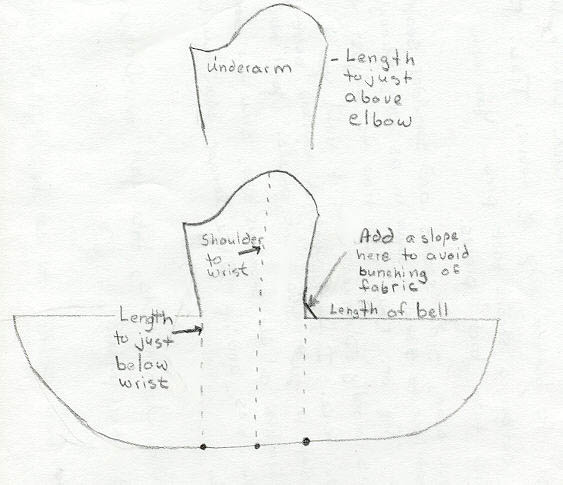
The bell hangs best with a seam that goes down the back of the arm. The sleeve with the pattern has an underarm seam. An easy way to move the seam is to make a muslin of the sleeve, try it on and draw a line down the back of your arm where you want the sleeve to be. End the line about one inch above the elbow. This allows for free movement of your elbow inside the bell. Cut sleeve open down the line you drew. Cut off length below the line, making sure seamlines match. You don't want one seam longer than the other! Trace new sleeve pattern, and add seam allowances to the new seamline

To make the bell, first decide how long you want it to be. Mine is 16 inches. Draw a line at a right angle from the bottom of the upper portion of the sleeve to match this measurement.

Next, determine your measurement from the shoulder to just below your wrist. Add 1/2" to this measurement for a seam allowance. Draw a line equal to this measurement down from the center of the sleeve cap. Extend sleeve seams to match the length of this line (dotted lines on drawing). Draw a straight line through the ends of these lines. This makes it so the sleeve isn't too long over your wrist.

Then, on one side, draw a curve attaching the end of this line to the end of the line marking the bell. Then fold the sleeve in half, matching the seam lines. Trace shape of the bell.

Sewing the seam between the upper arm and bell at a right angle causes bunching. To prevent this, draw a line from the side seam to the bell seam. It should be about an inch up the side seam and an inch over on the bell seam. This makes a slope which prevents bunching.

I found that the sleeve cap was a little too steep-it was more gathered than I wanted it to be. To fix this, I just trimmed a little off the top.

Sew the sleeve seam, gather the sleeve cap and sew to bodice. Check fit. If you're happy, you're ready to make the pattern for the coat!

The Coat

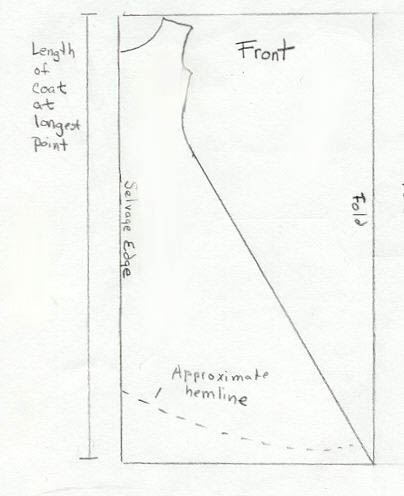
Determine how long you want the coat to be at its longest point. Rip or cut three panels of fabric to this measurement

Place bodice front on selvage edge of one folded panel. Trace. From waist measurement draw a diagonal line to the opposite bottom corner (the corner on the folded side of the fabric). Cut out front pieces.

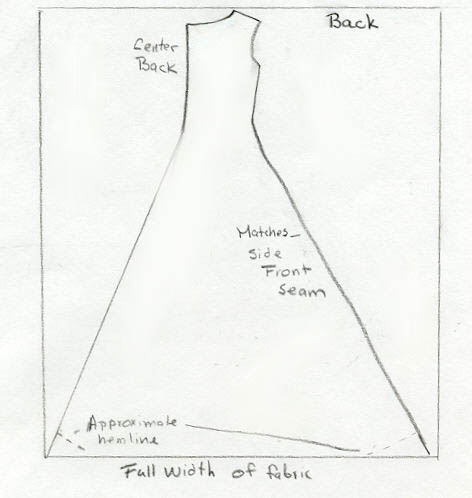
Place bodice back on the center of one unfolded panel. Trace. Take one front pattern piece, match side seams and trace the shape of the skirt, so front and back pieces match.

Next, draw a diagonal line from center back waist to the bottom corner of the fabric. Cut pattern piece out.

Place on third panel and cut out a second back piece. You now have two front pieces and two back pieces.


Assembling the Muslin

Sew center back seam, side seam, and shoulder seams. It's a good idea to sew a sleeve in as well, though not 100% necessary. Try on. Now it's time to adjust the hem. This is mostly playing with it until you find something you like. I found that it worked best to cut the slope in just the front panels. You'll need to adjust the length on the seamlines also, since the seams are cut on the bias and therefore a little longer than the rest of the skirt.

If you're happy with how it fits, take your muslin apart and use it as your pattern!

See the photo directions for information on how I put my coat together.


Travelling Coat Home

The Coat

Making the coat-Photos
Time to go home!